> ## Documentation Index
> Fetch the complete documentation index at: https://engage-docs.frigade.com/llms.txt
> Use this file to discover all available pages before exploring further.
# Guide: Product Tours & Hints
 ## In this guide
1. [Adding a Tour to your application](#adding-a-tour-to-your-application)
2. [Adding Hints to your application](#adding-hints-to-your-application)
3. [Tips and tricks](#tips-and-tricks)
## Adding a Tour to your application
In the Frigade Dashboard, create a new [Tour](https://app.frigade.com/prod/components/tour).
Pick out the elements in your application that you want to attach individual Steps to.
Each Step in a Tour uses a [CSS Selector](https://developer.mozilla.org/en-US/docs/Web/CSS/CSS_selectors) to attach itself to the element in your page that you want to highlight. We recommend adding a unique `id` to your element to ensure that Frigade can find it.
```tsx theme={"system"}
This is the element that we're going to attach a Tour Step to.
```
In the Frigade Dashboard, use the `selector` property in each step of your Tour to highlight the desired element in your application:
```yaml theme={"system"}
steps:
- title: "Welcome to Frigade!"
description: "This is a tour of the Frigade platform."
selector: "#my-element"
```
Add the [Tour](/component/tour) Component to your application with its corresponding Flow ID.
```tsx theme={"system"}
```
## Adding Hints to your application
In the Frigade Dashboard, create new [Hints](https://app.frigade.com/prod/components/hints).
Pick out the elements in your application that you want to attach individual Steps to.
Each Hint uses a [CSS Selector](https://developer.mozilla.org/en-US/docs/Web/CSS/CSS_selectors) to attach itself to the element in your page that you want to highlight. We recommend adding a unique `id` to your element to ensure that Frigade can find it.
```tsx theme={"system"}
This is the element that we're going to attach a Hint to.
```
In the Frigade Dashboard, use the `selector` property in each Hint to highlight the desired element in your application.
```yaml theme={"system"}
steps:
- title: "Welcome to Frigade!"
description: "This is a tour of the Frigade platform."
selector: "#my-element"
```
No, that's not a typo, Hints are actually a specially configured ``!
```tsx theme={"system"}
```
## Tips and tricks
### Seamless navigation between pages
One of the benefits of Frigade is that it can tap into your existing router to navigate users across pages without janky page refreshes. Check out our guide on [Navigation](/sdk/navigation) for setup.
### Debugging Steps
If a Step in a Tour is not appearing when you expect it to, you can enable debugging by enabling Verbose logging in your browser. To enable this in Chrome Devtools, simply click the three dot menu in the console as shown below:
## In this guide
1. [Adding a Tour to your application](#adding-a-tour-to-your-application)
2. [Adding Hints to your application](#adding-hints-to-your-application)
3. [Tips and tricks](#tips-and-tricks)
## Adding a Tour to your application
In the Frigade Dashboard, create a new [Tour](https://app.frigade.com/prod/components/tour).
Pick out the elements in your application that you want to attach individual Steps to.
Each Step in a Tour uses a [CSS Selector](https://developer.mozilla.org/en-US/docs/Web/CSS/CSS_selectors) to attach itself to the element in your page that you want to highlight. We recommend adding a unique `id` to your element to ensure that Frigade can find it.
```tsx theme={"system"}
This is the element that we're going to attach a Tour Step to.
```
In the Frigade Dashboard, use the `selector` property in each step of your Tour to highlight the desired element in your application:
```yaml theme={"system"}
steps:
- title: "Welcome to Frigade!"
description: "This is a tour of the Frigade platform."
selector: "#my-element"
```
Add the [Tour](/component/tour) Component to your application with its corresponding Flow ID.
```tsx theme={"system"}
```
## Adding Hints to your application
In the Frigade Dashboard, create new [Hints](https://app.frigade.com/prod/components/hints).
Pick out the elements in your application that you want to attach individual Steps to.
Each Hint uses a [CSS Selector](https://developer.mozilla.org/en-US/docs/Web/CSS/CSS_selectors) to attach itself to the element in your page that you want to highlight. We recommend adding a unique `id` to your element to ensure that Frigade can find it.
```tsx theme={"system"}
This is the element that we're going to attach a Hint to.
```
In the Frigade Dashboard, use the `selector` property in each Hint to highlight the desired element in your application.
```yaml theme={"system"}
steps:
- title: "Welcome to Frigade!"
description: "This is a tour of the Frigade platform."
selector: "#my-element"
```
No, that's not a typo, Hints are actually a specially configured ``!
```tsx theme={"system"}
```
## Tips and tricks
### Seamless navigation between pages
One of the benefits of Frigade is that it can tap into your existing router to navigate users across pages without janky page refreshes. Check out our guide on [Navigation](/sdk/navigation) for setup.
### Debugging Steps
If a Step in a Tour is not appearing when you expect it to, you can enable debugging by enabling Verbose logging in your browser. To enable this in Chrome Devtools, simply click the three dot menu in the console as shown below:
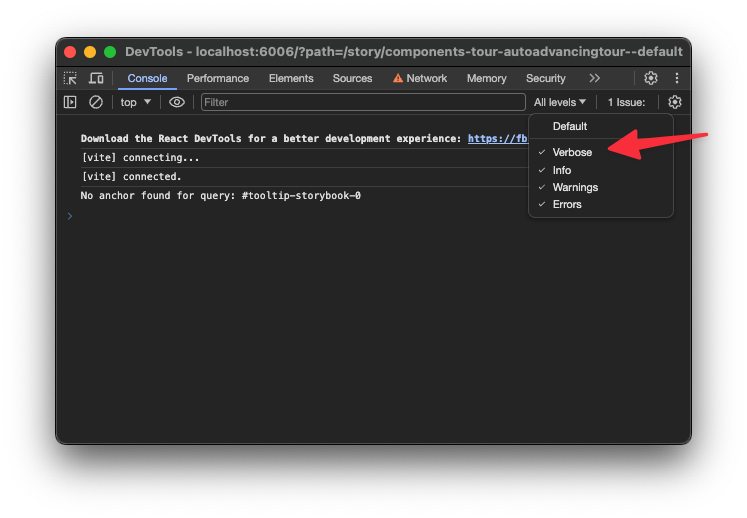 This will log if a selector is not found on the current page.
### Controlling the z-index of Steps
By default, Steps are rendered with a z-index of 9999. To change this, you can use the `zIndex` prop on a Tour:
```tsx theme={"system"}
```
Or alternatively, you can override the z-index for a specific Step directly in the YAML config using the `zIndex` property:
```yaml theme={"system"}
steps:
- id: my-tour-step
title: My title
subtitle: My subtitle
primaryButton:
title: Got it
selector: "#my-tour-step-anchor"
props:
zIndex: 42
```
### Overriding position for a specific Step
If you want to force a specific Step to show up on the left or right side of the targeted element, you can use the `align` and `side` properties in Config YAML to override the default positioning.
It follows the same syntax as the [align and side props](/component/tour#align) on the `Tour` component.
```yaml theme={"system"}
steps:
- id: my-tour-step
title: My title
subtitle: This Step will show up on the left of the target element, after its trailing edge
primaryButton:
title: Got it
selector: "#my-tour-step-anchor"
props:
align: after
side: left
```
### Offset x and y positioning
You can add a custom offset to the x and y positioning of each Step in a Tour using the `sideOffset` and `alignOffset` properties (see [Tour component documentation](/component/tour)).
Alternatively, you can override the offset for a specific Step directly in the YAML config by leveraging the `props` field:
```yaml theme={"system"}
steps:
- id: my-tour-step
title: My title
subtitle: My subtitle
primaryButton:
title: Got it
selector: "#my-tour-step-anchor"
props:
sideOffset: 10
alignOffset: -10
```
### Hiding CTA buttons
Sometimes you may want to hide the CTA button on a single Step for a user to take an action in your application rather than simply continuing the tour on every button click. To do this, simply omit the `primaryButton.title` property in the YAML config:
```yaml theme={"system"}
steps:
- id: my-tour-step
title: My title
subtitle: My subtitle
# Omitting primaryButton.title will hide the CTA button
# primaryButton:
# title: Got it
selector: "#my-tour-step-anchor"
```
### Programmatically completing a step
If you want too programmatically complete the step (e.g. an action in your app advances the Flow), see the documentation for automatically [advancing a Flow](/sdk/advanced/completing-a-step).
This will log if a selector is not found on the current page.
### Controlling the z-index of Steps
By default, Steps are rendered with a z-index of 9999. To change this, you can use the `zIndex` prop on a Tour:
```tsx theme={"system"}
```
Or alternatively, you can override the z-index for a specific Step directly in the YAML config using the `zIndex` property:
```yaml theme={"system"}
steps:
- id: my-tour-step
title: My title
subtitle: My subtitle
primaryButton:
title: Got it
selector: "#my-tour-step-anchor"
props:
zIndex: 42
```
### Overriding position for a specific Step
If you want to force a specific Step to show up on the left or right side of the targeted element, you can use the `align` and `side` properties in Config YAML to override the default positioning.
It follows the same syntax as the [align and side props](/component/tour#align) on the `Tour` component.
```yaml theme={"system"}
steps:
- id: my-tour-step
title: My title
subtitle: This Step will show up on the left of the target element, after its trailing edge
primaryButton:
title: Got it
selector: "#my-tour-step-anchor"
props:
align: after
side: left
```
### Offset x and y positioning
You can add a custom offset to the x and y positioning of each Step in a Tour using the `sideOffset` and `alignOffset` properties (see [Tour component documentation](/component/tour)).
Alternatively, you can override the offset for a specific Step directly in the YAML config by leveraging the `props` field:
```yaml theme={"system"}
steps:
- id: my-tour-step
title: My title
subtitle: My subtitle
primaryButton:
title: Got it
selector: "#my-tour-step-anchor"
props:
sideOffset: 10
alignOffset: -10
```
### Hiding CTA buttons
Sometimes you may want to hide the CTA button on a single Step for a user to take an action in your application rather than simply continuing the tour on every button click. To do this, simply omit the `primaryButton.title` property in the YAML config:
```yaml theme={"system"}
steps:
- id: my-tour-step
title: My title
subtitle: My subtitle
# Omitting primaryButton.title will hide the CTA button
# primaryButton:
# title: Got it
selector: "#my-tour-step-anchor"
```
### Programmatically completing a step
If you want too programmatically complete the step (e.g. an action in your app advances the Flow), see the documentation for automatically [advancing a Flow](/sdk/advanced/completing-a-step).